5. openstack制作window镜像
5.1. 环境准备
5.1.1. 启用hyperv
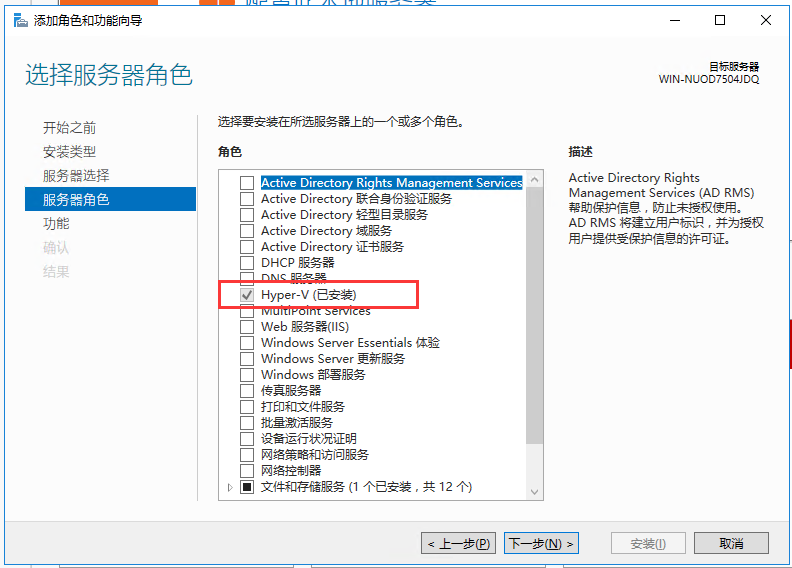
5.1.2. 确保powershell 版本>4.0
PS C:\Users\Administrator> $PSVersionTable

Name                           Value
----                           -----
PSVersion                      5.1.14393.1884
PSEdition                      Desktop
PSCompatibleVersions           {1.0, 2.0, 3.0, 4.0...}
BuildVersion                   10.0.14393.1884
CLRVersion                     4.0.30319.42000
WSManStackVersion              3.0
PSRemotingProtocolVersion      2.3
SerializationVersion           1.1.0.1


PS C:\Users\Administrator>
5.2. 安装软件
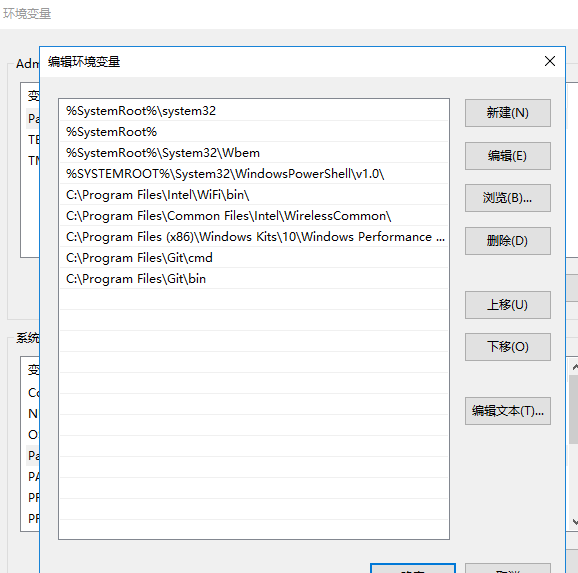
5.3. 安装编译镜像
5.3.1. 创建目录
C:\image: 用于保存生成后的镜像C:\externaldriver: 用于放置镜像需要的其他驱动。比如kvm镜像需要 virt-win.iso中的相关virt驱动
5.3.2. 拷贝和解压必要的驱动到 C:\externaldriver 中
略
5.3.3. 挂载iso镜像到驱动器D:
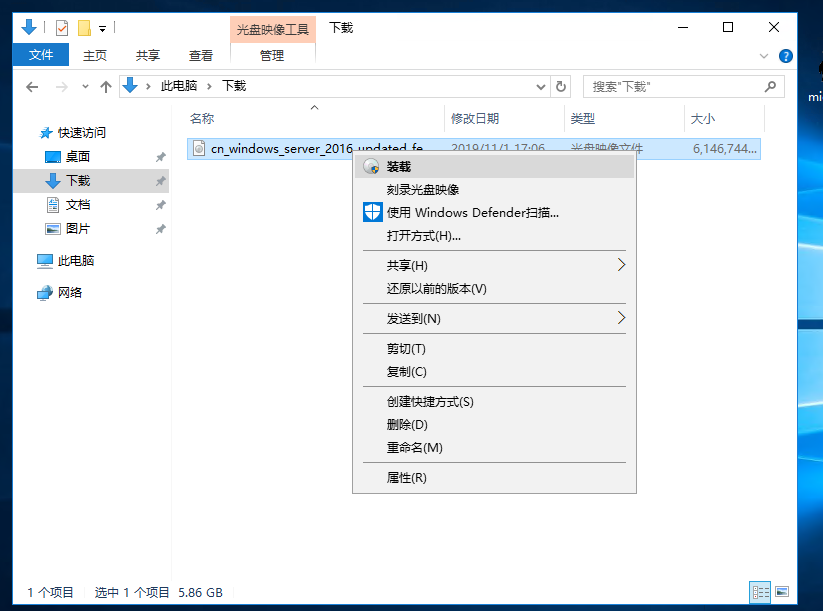
5.3.4. 下载 windows-openstack-imaging-tools
git clone https://github.com/cloudbase/windows-openstack-imaging-tools.git
5.3.5. 创建和运行脚本 create-windows-cloud-image.ps1:
参考
cd windows-openstack-imaging-tools/

#如果是制作ironic镜像,那么 ``windows-curtin-hooks`` 和 ``WindowsUpdates`` git submodules 是必须的
通过运行 ``git submodule update --init`` 去检索
git submodule update --init

#导入 ``WinImageBuilder.psm1`` 模块
Import-Module .\WinImageBuilder.psm1

#设置环境变量
$windowsImagePath = "C:\image\window2016.qcow2"
$VirtIOISOPath = "C:\image\virtio.iso"
$virtIODownloadLink = "https://fedorapeople.org/groups/virt/virtio-win/direct-downloads/archive-virtio/virtio-win-0.1.133-2/virtio-win.iso"
(New-Object System.Net.WebClient).DownloadFile($virtIODownloadLink, $VirtIOISOPath)
$wimFilePath = "D:\sources\install.wim"
$extraDriversPath = "C:\externaldriver\"
$image = (Get-WimFileImagesInfo -WimFilePath $wimFilePath)[1]
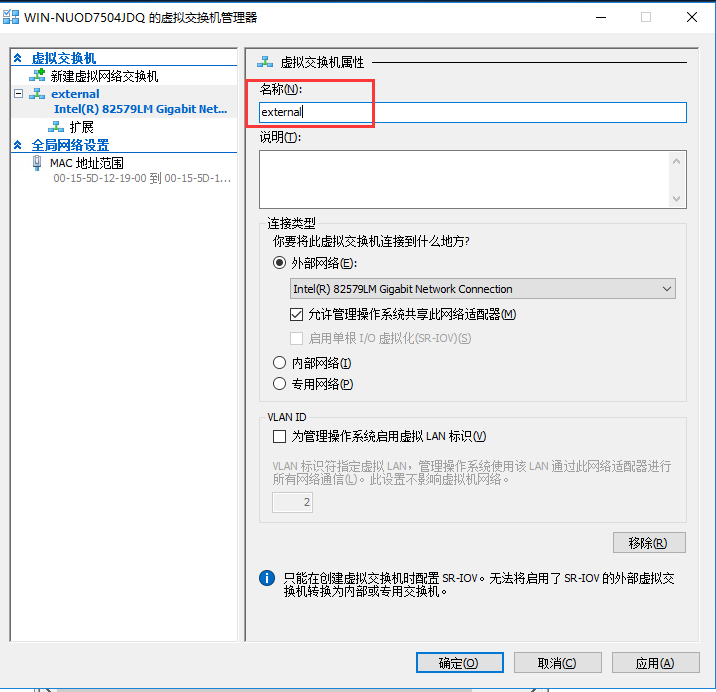
$switchName = 'external'

#编译镜像
Set-IniFileValue -Path $configFilePath -Section "Default" -Key "wim_file_path" -Value $wimFilePath
Set-IniFileValue -Path $configFilePath -Section "Default" -Key "image_name" -Value $image.ImageName
Set-IniFileValue -Path $configFilePath -Section "Default" -Key "image_path" -Value $windowsImagePath
Set-IniFileValue -Path $configFilePath -Section "Default" -Key "image_type" -Value "MAAS"
Set-IniFileValue -Path $configFilePath -Section "Default" -Key "install_maas_hooks" -Value "True"
Set-IniFileValue -Path $configFilePath -Section "vm" -Key "cpu_count" -Value 2
Set-IniFileValue -Path $configFilePath -Section "vm" -Key "ram_size" -Value (4GB)
Set-IniFileValue -Path $configFilePath -Section "vm" -Key "disk_size" -Value (30GB)
Set-IniFileValue -Path $configFilePath -Section "vm" -Key "external_switch" -Value $switchName
Set-IniFileValue -Path $configFilePath -Section "drivers" -Key "virtio_iso_path" -Value $virtIOISOPath
Set-IniFileValue -Path $configFilePath -Section "drivers" -Key "drivers_path" -Value $extraDriversPath
Set-IniFileValue -Path $configFilePath -Section "updates" -Key "install_updates" -Value "True"
Set-IniFileValue -Path $configFilePath -Section "updates" -Key "purge_updates" -Value "True"
Set-IniFileValue -Path $configFilePath -Section "sysprep" -Key "disable_swap" -Value "True"

# This scripts generates a raw tar.gz-ed image file, that can be used with MAAS
New-WindowsOnlineImage -ConfigFilePath $configFilePath
5.4. 注意事项
中间下载cloudbase-init会很慢。我们预先下载好相关的文件
5.4.1. virtio.iso
1. 下载链接:https://fedorapeople.org/groups/virt/virtio-win/direct-downloads/archive-virtio/virtio-win-0.1.133-2/virtio-win.iso
2. 保存位置 $VirtIOISOPath = "C:\image\virtio.iso"
3. 将 ``create-windows-online-cloud-image.ps1`` 文件中的 ``(New-Object System.Net.WebClient).DownloadFile($virtIODownloadLink, $virtIOISOPath)`` 注释掉

5.4.2. CloudbaseInitSetup_Stable_x64.msi
1. 下载地址: https://www.cloudbase.it/downloads/CloudbaseInitSetup_Stable_x64.msi 此链接已经失效,使用这个:https://github.com/cloudbase/cloudbase-init/releases/download/0.9.11/CloudbaseInitSetup_0_9_11_x64.msi
2. 将改文件下载并重名为 ``CloudbaseInit.msi`` 拷贝到 *c://images* 文件夹下
3. 设置环境变量:$MsiPath=c://images/CloudbaseInit.msi
4. 执行Set-IniFileValue -Path $configFilePath -Section "Default" -Key "msi_path" -Value $MsiPath
5.5. 代码解读
在 https://github.com/cloudbase/windows-openstack-imaging-tools/tree/master/Examples 目录下有三个可执行的脚本。使用这三个脚本可以构造不通场景下的
window镜像,
我们这里以 create-windows-online-cloud-image.ps1 为例。简单介绍一下windows-openstack-imaging-tools的基本代码